![City Hive Logo-2.png]](https://support.cityhive.net/hs-fs/hubfs/City%20Hive%20Logo-2.png?width=62&height=60&name=City%20Hive%20Logo-2.png)
- Click (+) next to the search bar

- Select Create Automatic Discount

- Select the Advanced option

- Fill out the details, Rule Name and Description
- Select the discount amount
- Divide the discounted total (2 for $10, 3 for $30, etc.) and divide it by the total number of items ( 2 for $20, 3 for $30, etc.)
Ex. - if the promotion is 2 for $24, the discount amount would be $12. Then make sure to turn on the fixed price option, as this will change the price of the selected products to the discounted amount you set above.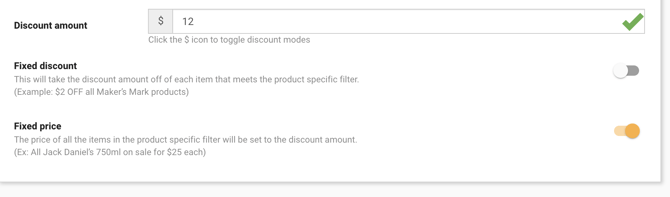
- Click Continue and fill out the rest of the discount plugins if necessary
- Head over to the Category and Product section
- Filter the product that will receive the discount and set the desired quantity
- Use one of the fields from the drop down list to filter the desired product you wish to discount
- Set the minimum and maximum product quantity to the number of products that will receive the discount
Ex. - If the discount is 3 for $30, the minimum and maximum product quantity would be 3
Make sure to enable the Discount Qualifying Products Only option to ensure the whole cart doesn't receive the discount.
If you have any questions, let us know at support@cityhive.net